1. Adding an EmpikPlace account
In the ‘Channels’ menu, select the ‘All channels’ tab, search for EmpikPlace in the list of platforms and click ‘Connect’
You will be transferred to the EmpikPlace login panel. Then the window for granting access to the shop will appear, where you have to click ‘Confirm’.
After correct verification, the connected new channel will appear in the ‘Dashboard’ menu:
2. Import of offers
We recommend that you list your offers first, as some of the products may already be present in our catalogue and this will speed up the start of sales.
The first step is to set up the field mappings that are needed for listing in EmpikPlace.
In the ‘Channels’ menu, please select EmpikPlace and on the next sub-page, please select ‘Filed Mapping’
In this section, you will find a table where, in the ‘Field name’ column, you will find the names of the attributes that are responsible for creating the offer. These attributes map to the attributes that are assigned to the products uploaded to Shoppingfeed (‘Change the field’ column).
Below is a table with explanations of the fields and how to map them.
| Field name | Description |
1 | available-end-date | To be completed if the offer is to be active for a limited time. Format: YYYY-MM-DDT00:00:00.000+02:00 |
2 | min-quantity-alert | If the stock of an offer falls below this number set by the alert, a notification will come. |
3 | product-id | Product identification code. This should be the value that will be defined in the ‘product-id-type’ field. |
4 | update-delete | Leave blank. |
5 | state | If new products are being sold, set ‘static filed’ with a value of ‘11’. If, non-new products are also offered, please contact EmpikPlace support first. |
6 | sku | The field that corresponds to the SKU code must be mapped (alternatively the EAN code can be set) |
7 | quantity | Product quantity |
8 | price-additional-info | Leave blank. |
9 | price | Product price |
10 | logistic-class | Can be left blank. If logistic classes are assigned to offers, the field with the logistic class code must be mapped here. The logistics classes are set up in the EmpikPlace seller panel. |
11 | available-start-date | To be completed in case the offer is to be activated at a different date. Format: YYYY-MM-DDT00:00:00.000+02:00 |
12 | leadtime-to-ship | Map the field containing the value of the order preparation time for dispatch (1-45 days). Left blank, it will assign a default time of 1 day. |
13 | internal-description | Leave blank. |
14 | favorite-rank | Leave blank. |
15 | discount-start-date | Fields responsible for the promotion of offers. Explained in a separate section of the manual. |
16 | discount-price |
17 | discount-end-date |
18 | description | Leave blank. To be completed in case of sale of non-new products. |
19 | product-id-type | Selectable type: EAN or SHOP_SKU. Can be set via static field or mapped product field. We suggest using the EAN code. In the case of SHOP_SKU, this code must match the SKU code in the EmpikPlace product catalogue. |
20 | vatmargin | Leave blank. To be completed in case of sale of non-new products (yes, no or blank) |
| REQUIRED FIELDS |
A minimal version of the mapping that will allow bids to be issued:
Once the fields have been mapped, include the products for import in the ‘Selection’ menu and click ‘Update’ at the top of the page.
A notification will show in the ‘Timeline’ tab when the export of products is complete.
2.1 Discount prices
In order to set discount prices in EmpikPlace, at least one additional field with the discount price (discount-price) and possibly an additional 2 fields with the start and end time of the promotion (discount-start-date, discount-end-date) have to be prepared in the source file / product source (or completed via Supplemental Feed).
Such fields should then be mapped in the ‘Field Mapping’ section, as described in section 2.
15 | discount-start-date | Format: YYYY-MM-DDT00:00:00.000+02:00 |
16 | discount-price | Disocunt price (should be lower than main price) |
17 | discount-end-date | Format: YYYY-MM-DDT00:00:00.000+02:00 |
Without setting an end time for the discount, the promotion will continue until the value is removed from the product source feed.
3. Import of products
If you have products in your offer that are not in the EmpikPlace catalogue, you can easily add them to the catalogue.
In the ‘Channels’ menu, please select EmpikPlace and then in the ‘Selection’ section assign categories from EmpikPlace to categories from the source feed.
You assign the categories from the source (on the left) by searching for them in the search engine on the right (type in a keyword and select from the list). Please be aware that the list of categories are in Polish.
↓
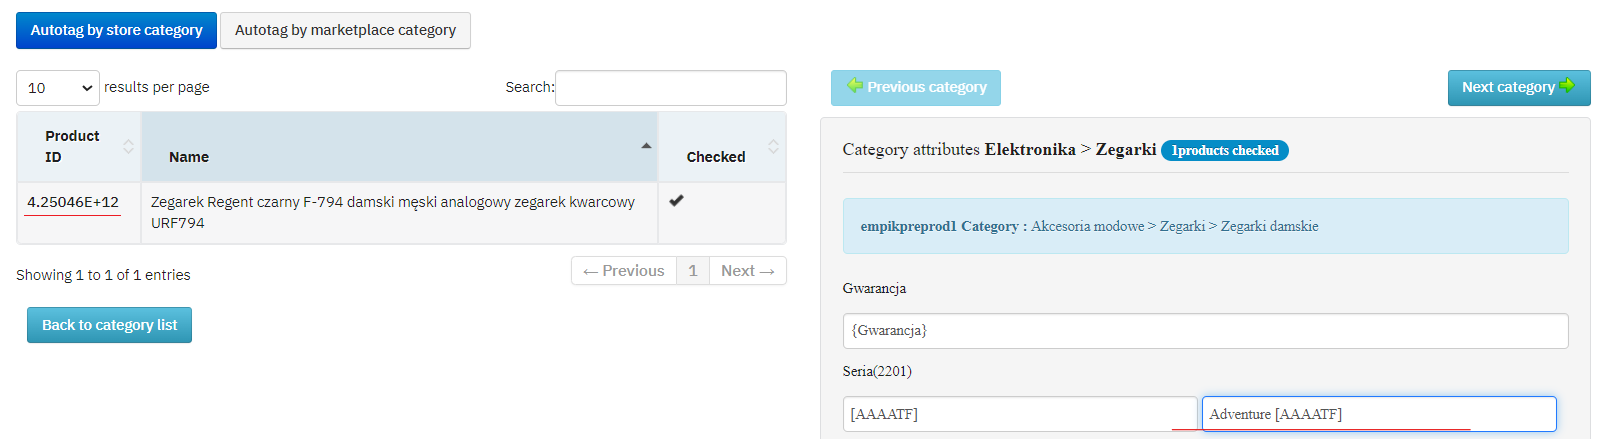
Once this has been done for all categories, it is necessary to move on to attribute mapping. To do this, go to the ‘Autotag’ tab.
A view will appear where you can map attributes based on categories from the product source (store) or categories from the marketplace. The second column also shows the mapping status of the required parameters.
To start mapping, select a category or go to mapping by marketplace category.
The mapping in both cases looks the same. Please assign an attribute from the marketplace to an attribute from the feed source or enter a fixed value.
All fields marked

must be filled in.
You can easily search for attribute tags by typing the first characters of the tag, a list of choices will appear. Tags are always enclosed in brackets {x}. The values from the products in the Shoppingfeed catalogue will then be substituted.
When you want to fill in an attribute with a constant value for the entire category, you enter this value in the field (without brackets).
The third option for the fields to be filled in are the selectable fields. In this case, the values of the fields assigned to the products in Shoppingfeed must match the values that are selectable in the marketplace.
If the values in the source product feed are the same as in EmpikPlace, then it is sufficient to map the field.
If these fields are different, the source file must be updated or the appropriate value can be selected from the list:
↓
In this way, you will assign the same values for the entire category. If you need to do this for only 1 product, select the product from the list on the left and then map the attributes only for this product (click on the ID), after making changes select the ‘Back to product list’ button
↓
More information on the mapping of ‘Autotag’ attributes can be found HERE.
Attribute values can also be manipulated by automatic actions (‘Rules’ tab). More on this HERE.
Changes are saved automatically. Once the categories and attributes have been mapped, the product import can be sent by clicking on the ‘Update’ button at the top of the page and, as in the case of offers, the import sending can be monitored there. To check if the import was successful, go to EmpikPlace Seller Panel (Catalogue -> Product Imports) and check if the product import contains errors.